People see a tin tacker on a bar wall and assume it's simple — it's just a piece of metal with a picture on it, right? The reality is more involved than you'd think. Here's a behind-the-scenes look at how custom tin tackers go from your artwork file to a finished sign.
Step 1: Artwork and Pre-Press
Everything starts with your design. We need vector artwork (AI, EPS, or high-res PDF) in the correct dimensions for the sign shape you've chosen. Our pre-press team checks color separations, adjusts for bleed, and makes sure the emboss areas line up correctly with the design elements. This is crucial — if the embossing doesn't align with the artwork, the whole sign looks off.
We'll send you a digital proof showing exactly how your finished tacker will look, including where the embossing will hit. Most orders go through one or two rounds of proofs before approval.
Step 2: Printing
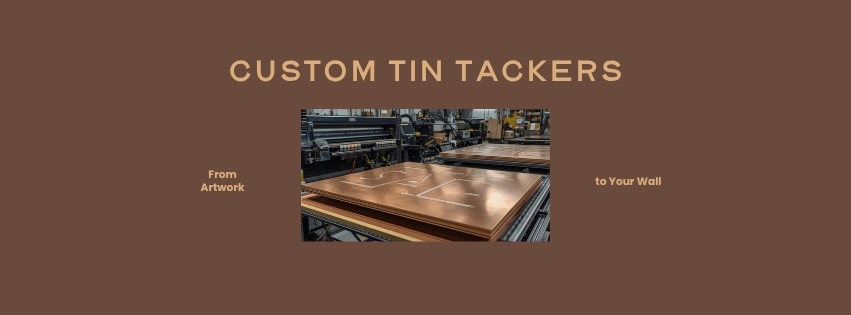
Once approved, your artwork is printed onto flat aluminum sheets. We use high-quality lithographic printing that bonds the ink directly to the metal surface. The colors are rich and vibrant, and the print is durable enough to handle years of bar life without fading. For smaller runs, we use digital printing, which gives us flexibility on quantity without sacrificing quality.
Step 3: Embossing
This is where tin tackers get their signature look. The printed aluminum sheets are fed through an embossing press — a massive machine with custom steel dies that press the design into the metal. The result is that three-dimensional, raised effect that gives tin tackers their tactile appeal. The embossing depth is typically around 1/8" to 3/16", enough to create visible shadows and a satisfying texture.
The dies are precision-machined to match each unique design. This is actually the most expensive part of a first-time order — the die tooling. But once your die is made, it's kept on file for reorders.
Step 4: Cutting and Finishing
After embossing, each sign is die-cut to its final shape. Whether it's a standard square, a circle, a bottle cap with crimped edges, or a custom die-cut silhouette, the cutting is done with precision steel rule dies. Edges are rolled or hemmed for safety — no sharp edges to worry about.
Pre-drilled mounting holes are punched at this stage, usually at the corners. Some shapes get grommets instead, depending on the design and how the sign will be displayed.
Step 5: Quality Check and Packing
Every sign gets inspected for print quality, emboss alignment, and edge finishing. Signs that don't meet our standards get pulled. The ones that pass are individually wrapped to prevent scratching during transit and packed into sturdy cartons.
Step 6: Shipping
Tin tackers are lightweight and flat, which makes shipping straightforward. A box of 100 signs doesn't weigh much and stacks nicely on a pallet. Most domestic orders ship within 3-4 weeks from proof approval, though rush options are available if you need them faster.
The whole process is surprisingly hands-on. Despite modern printing technology, tin tacker manufacturing still relies on skilled operators running heavy presses. It's a blend of old-school metalwork and modern design that produces something genuinely unique.